Earth Rod Seal Installation
Single Earth Rod Seal
Introduction
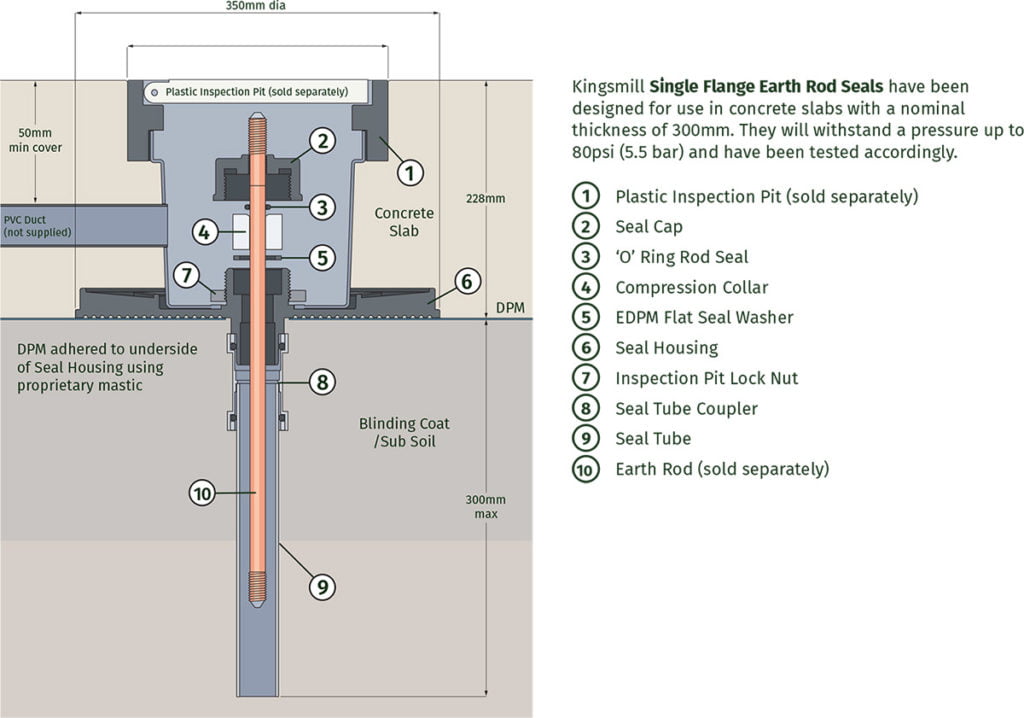
The Kingsmill Standard Single Earth Rod Seal has been designed for use in concrete slabs with a nominal thickness of 300mm. Kingsmill Earth Rod Seals will withstand a pressure up to 80psi (5.5 bar) and have been tested accordingly.
Kingsmill Standard Single Earth Rod Seals have been designed to be used in conjunction with Kingsmill Plastic Inspection Pits (PPIT-G). Kingsmill Plastic Inspection Pits are suitable for a load rating of 5,000kg and are suitable for most types of earthing and lightning protection installations.
Parts:
Ensure that the correct seal has been ordered for the size of Earth Rod to be installed.
- KES-58 – 5/8” Copperbond Earth Rod
- KES-34 – 3/4” Copperbond Earth Rod
- KES-15 – 15mm Solid Copper/Stainless Steel Earth Rods
- KES-16 – 16mm Solid Copper/Stainless Steel Earth Rods
- KES-20 – 20mm Solid Copper/Stainless Steel Earth Rods
Check that all parts are present before installation:
- Plastic Inspection Pit (Sold Separately)
- Seal Cap
- ‘O’ Ring Rod Seal
- Compression Collar
- EDPM Flat Seal Washer
- Seal Housing
- Inspection Pit Lock Nut
- Seal Tube Coupler
- Seal Tube
Installation: (Read in conjunction with illustration)
- Remove Seal Cap (2), ‘O’ Ring Seal (3)’ Compression Collar (4), EDPM Flat Washer (5) and Inspection Pit Lock Nut (7). Keep all loose parts safe until required.
- Fit Seal Tube Coupler (8) onto Seal Tube (9) then fit both assembled parts (8),(9) onto the base of the Seal Housing (6) ensuring all parts are fully engaged. Note: Ensure that all components are clean prior to assembly.
- Using a hole saw, make a suitable size hole on the wall side(s) of the Plastic Inspection Pit (1) to accept the plastic cable duct (not supplied) for the earth conductor/ tape. Position of the cable duct should allow for a minimum covering of concrete of 50mm.
- Install Plastic Inspection Pit (1) onto the Seal Housing (6) and secure using Inspection Pit Lock Nut (7) ensuring that the two adjoining component faces and threads are free from debris/stones.
- Position the earth assembly at the required site location ensuring that there are no obstructions within or at the bottom of the earth tube. It may be necessary to depress or build up the blinding coat or damp proof membrane (DPM) to ensure that the top of the Plastic Inspection Pit is in accordance with the finished floor level.
- When a waterproof membrane is used it should be adhered to the underside of the Seal Housing (6) using proprietary building mastic. The mastic layer should be applied in a heavy circular formation so that the grooved underside of the Seal Housing (6) can be sealed without causing breaks and leakage paths.
- The use of temporary bracing would be an advantage to secure the seal assembly during rod driving and subsequent concrete pouring.
- Once the Seal Housing(6) and Plastic Inspection Pit(1) are in place commence driving the rod to the required depth ensuring that the top of the earth rod is below the bottom face of the Plastic Inspection Pit lid.
- After driving the rods ensure that the inside bore within the Seal Housing (6) is clean and that no damage has been caused.
- Pass the EDPM Flat Seal Washer (5) over the earth rod into the Seal Housing (6), next insert the Compression Collar (4) in the same way, pass the ‘O’ Ring Rod Seal (3) over the rod so it touches the top of the Compression Collar (4) already installed.
- Finally screw the Seal Cap (2) onto the Seal Housing (6) ensuring all other components have been assembled and hand tighten only.
Note: On some Earth Rod sizes the Seal Cap (2) will be a threaded component and must be screwed over the threaded portion of the Earth Rod.
Complete the earth conductor/tape connection to the Earth Rod and lock the Plastic Inspection Pit lid with the key supplied.
Maintenance:
When installed the Earth Rod Seal should require little or no maintenance other than the Seal Cap remaining tight.
Benefits:
One of the key benefits of the Kingsmill Earth Rod Seal is that additional Earth Rods can be driven at a later date should the need arise with no additional parts or causing damage to the Earth Rod Seal.
If it is necessary to remove the Earth Rod Seal arrangement to facilitate rod extension, the following procedure should be followed:
- Carefully remove the Seal Sap (2) and ‘O’ Ring Rod Seal (3).
- Remove the Compression Collar (4).
- After driving the required Earth Rods ensuring installation method numbers 8 & 9 are followed, repeat the above steps in reverse order.
Final Note:
Kingsmill take every precaution to ensure the performance of its products, and recommendations given are in good faith. However, Kingsmill cannot control the installation of our products, therefore cannot give any warranty or result obtained. It is the responsibility of the customer to assume all risks and liabilities incurred in the use of Kingsmill products whether used alone or in conjunction with other products.